Patient Payments, Powered by Stripe
Follow the steps outlined below to enroll with Stripe and connect your Office Ally account. Finalizing your Stripe enrollment will enable your office to begin accepting credit card payments in just a few minutes directly from Practice Management.
Setting Up Patient Payments in Practice Mate
* To complete the Stripe enrollment and Office Ally account connection, you will need Administrator Access to your Office Ally Account.
If you have already have enrolled with Stripe, you can click here to skip to Payment Processing Instructions within Practice Mate.
Adding Patient Payments
STEP 1
While logged into your Practice Mate account:
- Select the Apps box in to upper left hand corner of the screen.
- Open the Account Management screen.
- Add Patient Payments by clicking on the Patient Payments tab underneath the Discover New Products section.
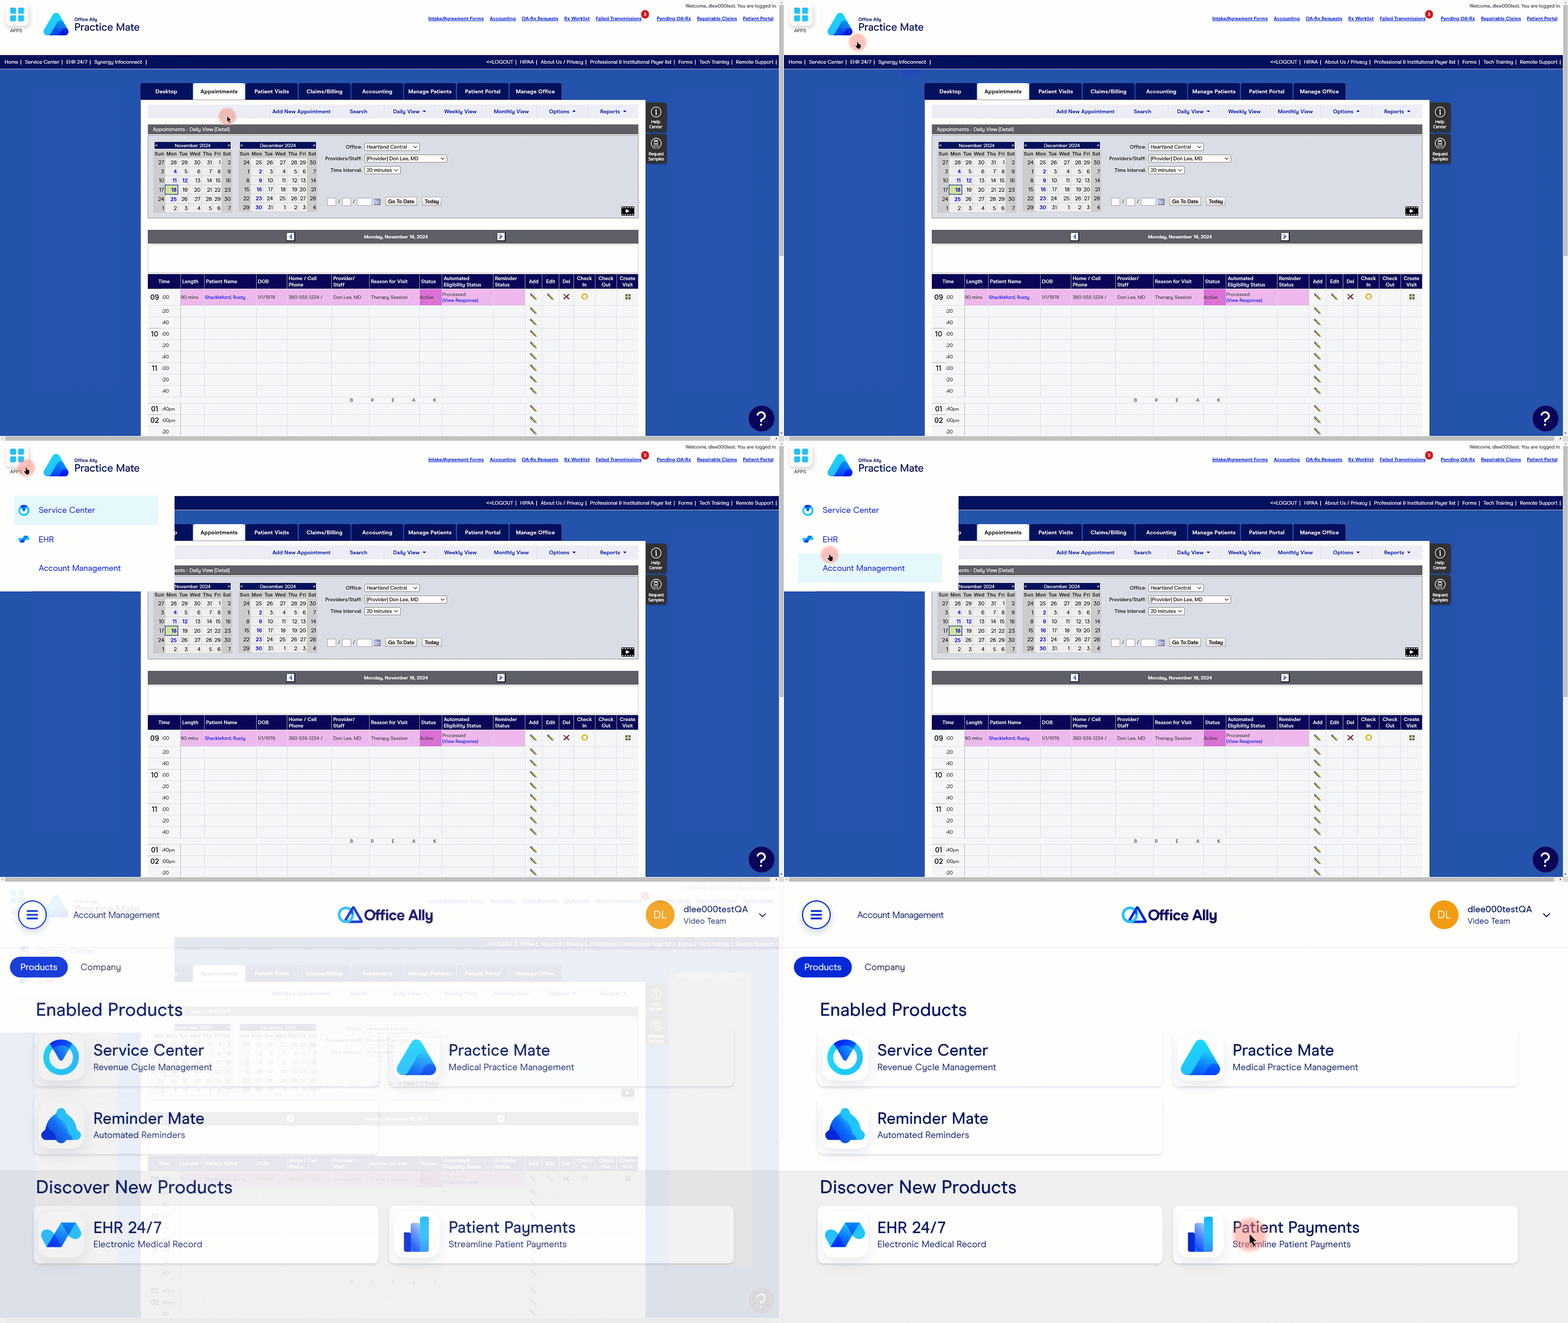
Start Stripe Enrollment
Step 2
With Patient Payments added to Patient Payments:
- Select "Continue Stripe Setup."
- Enter the email you want linked to Stripe.
- This can differ from the email linked to your Office Ally account.
- Click Submit.
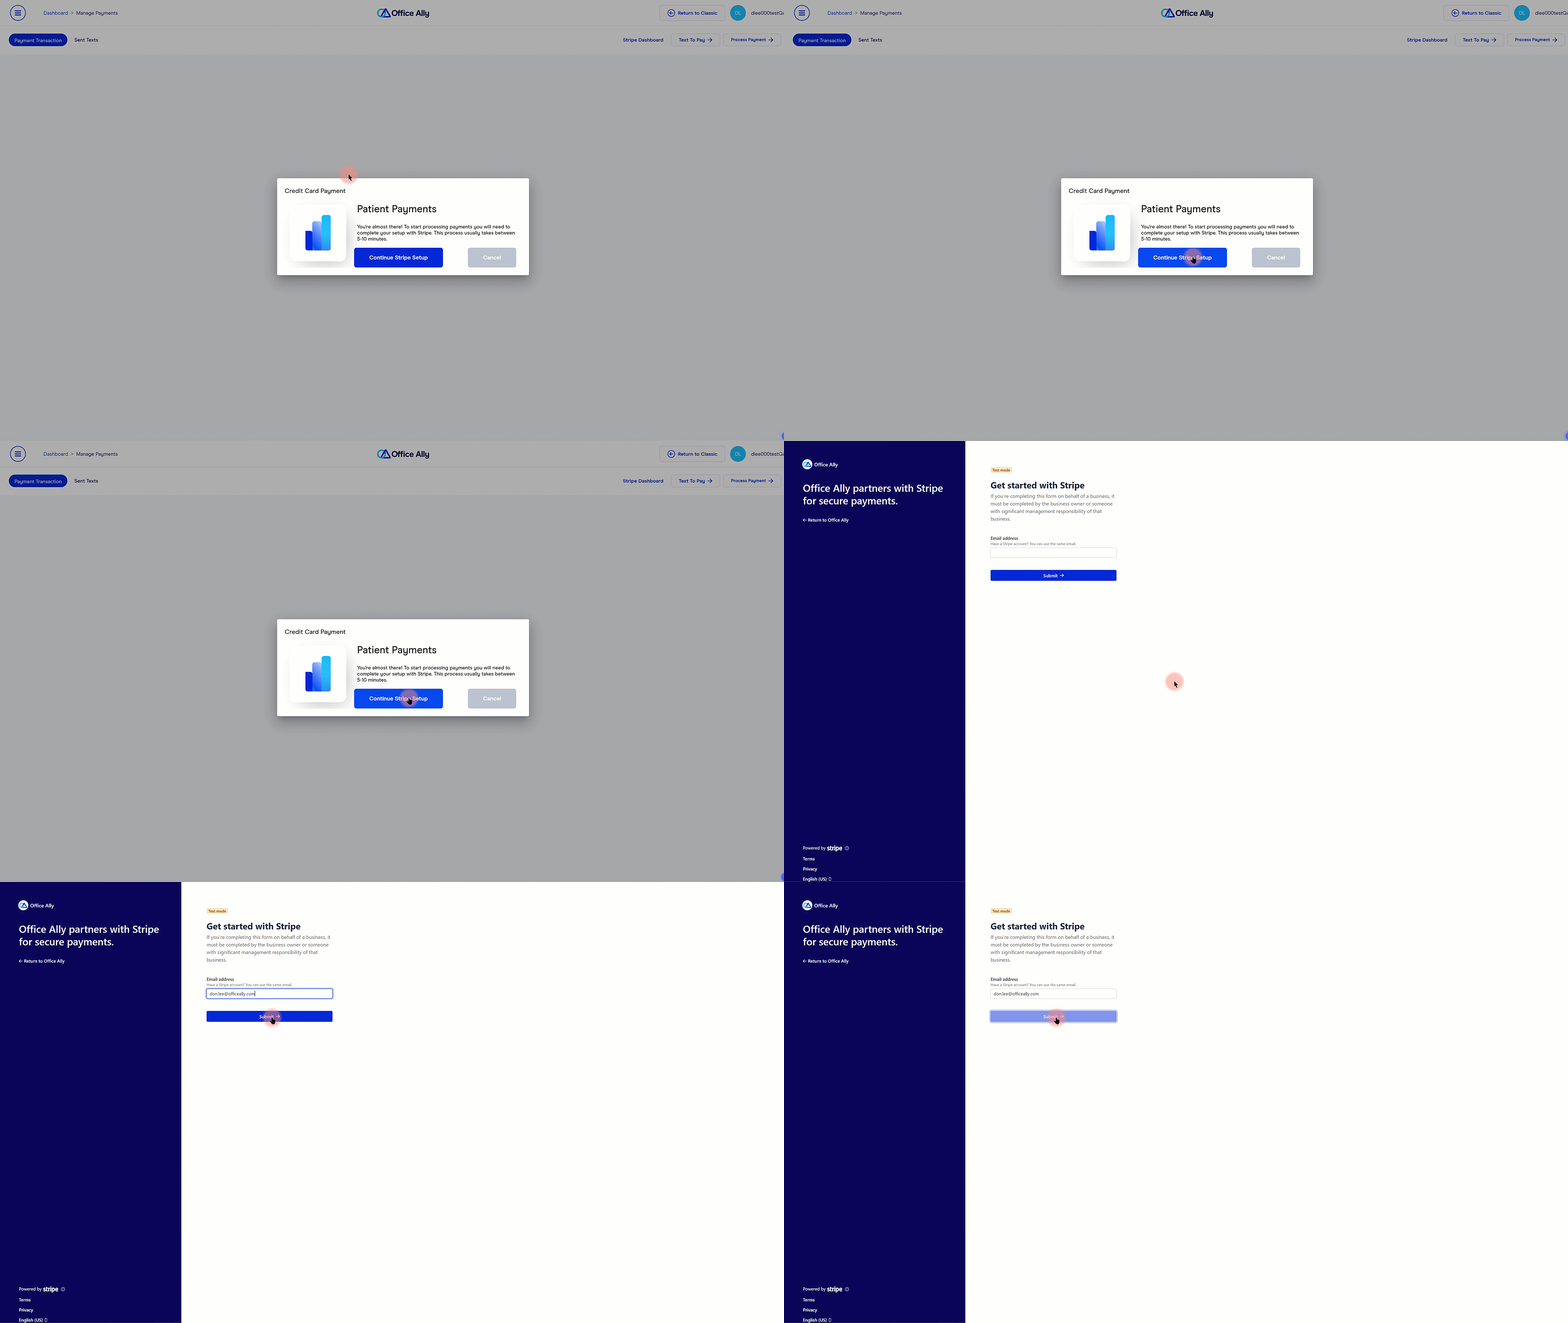
Set Up Stripe Password
STEP 3
Continue your Stripe enrollment by setting up a password.
Your Stripe password cannot be:
- Fewer than 10 characters
- An English dictionary word
- A common name or surname
- A statistically common password
- A chain of repeated characters or numbers, i.e., "99999999"
- A sequence of characters or numbers, i.e.,"abcdefgh" or "01234567"
- A date, i.e., "12.23.1996"
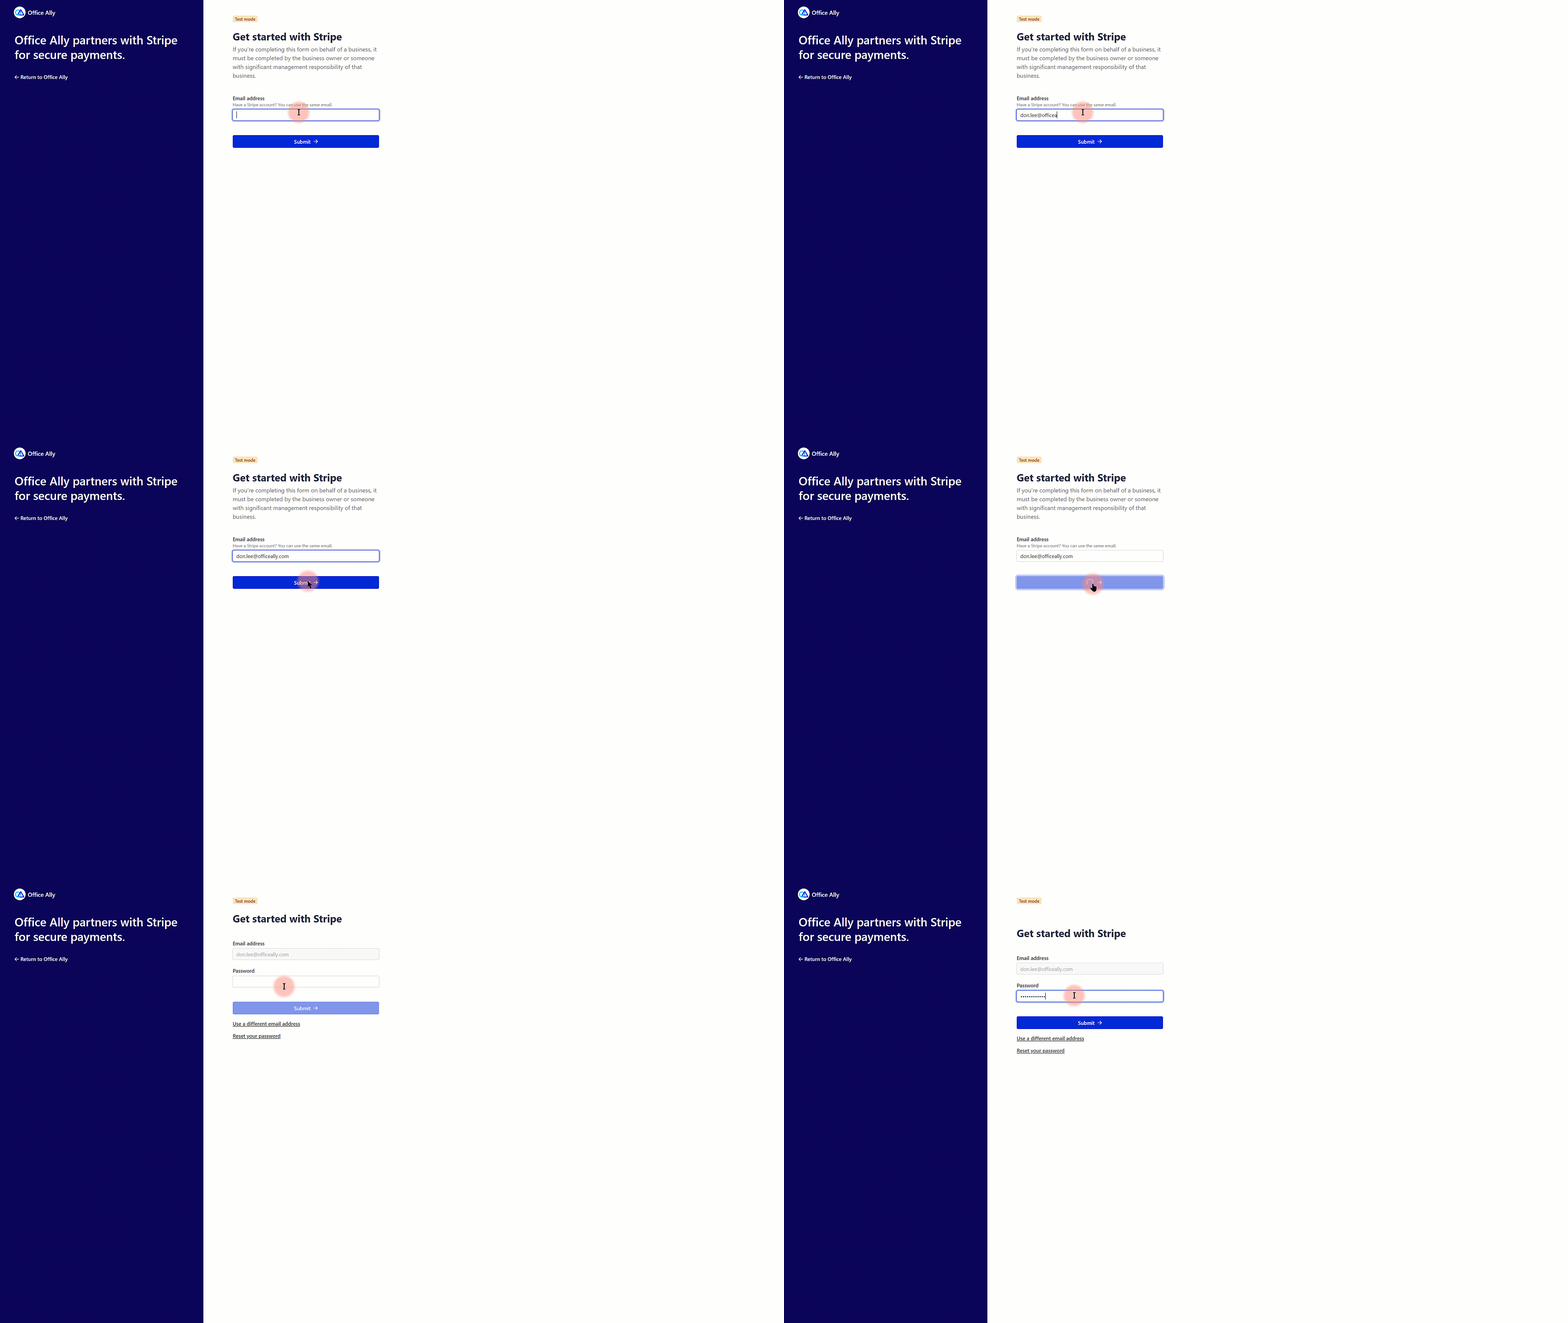
Verify Your Business
STEP 4
Complete Stripe's Verify Your Business set up form. This includes describing your business, providing account holders information and basic business information.


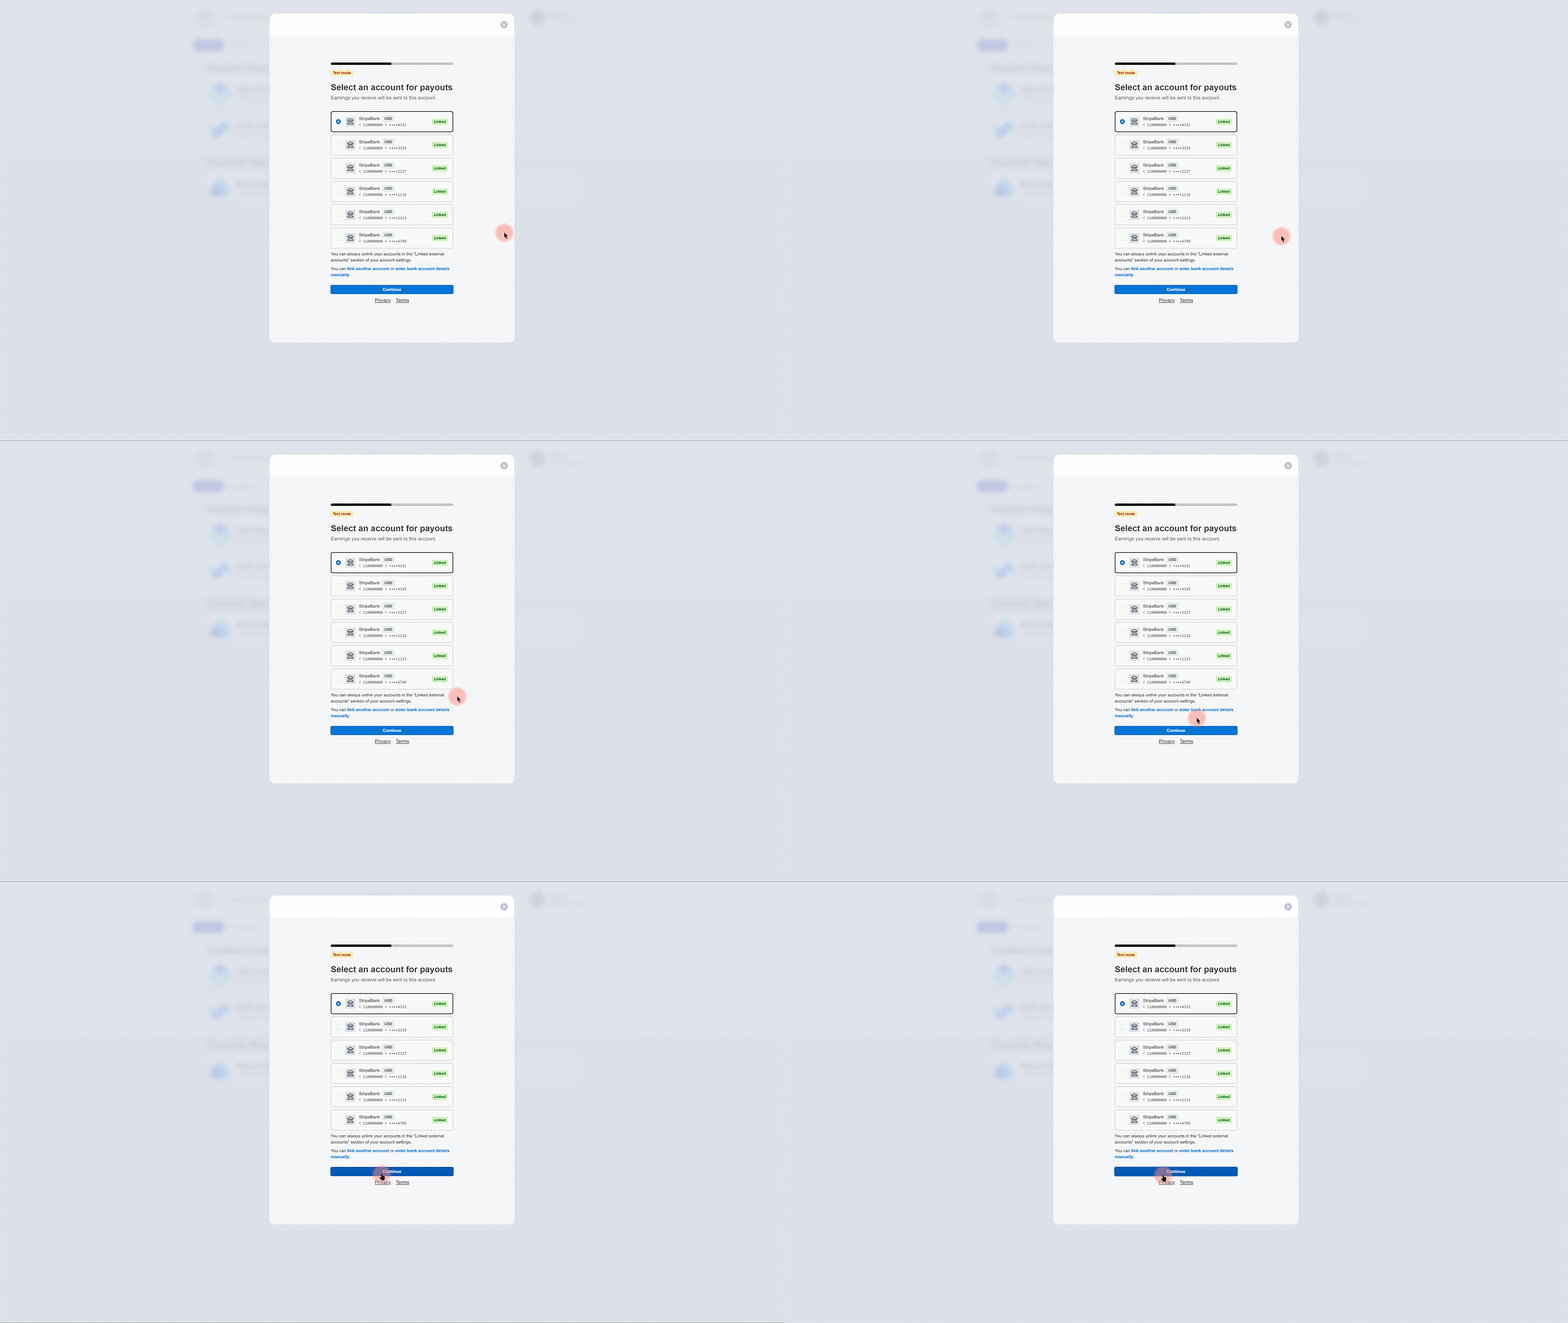
Connect Your Bank Account
STEP 5
Continue your Stripe enrollment by using the Stripe form to connect your bank account to your Stripe account. This allows Stripe to deposit payouts to your account automatically.
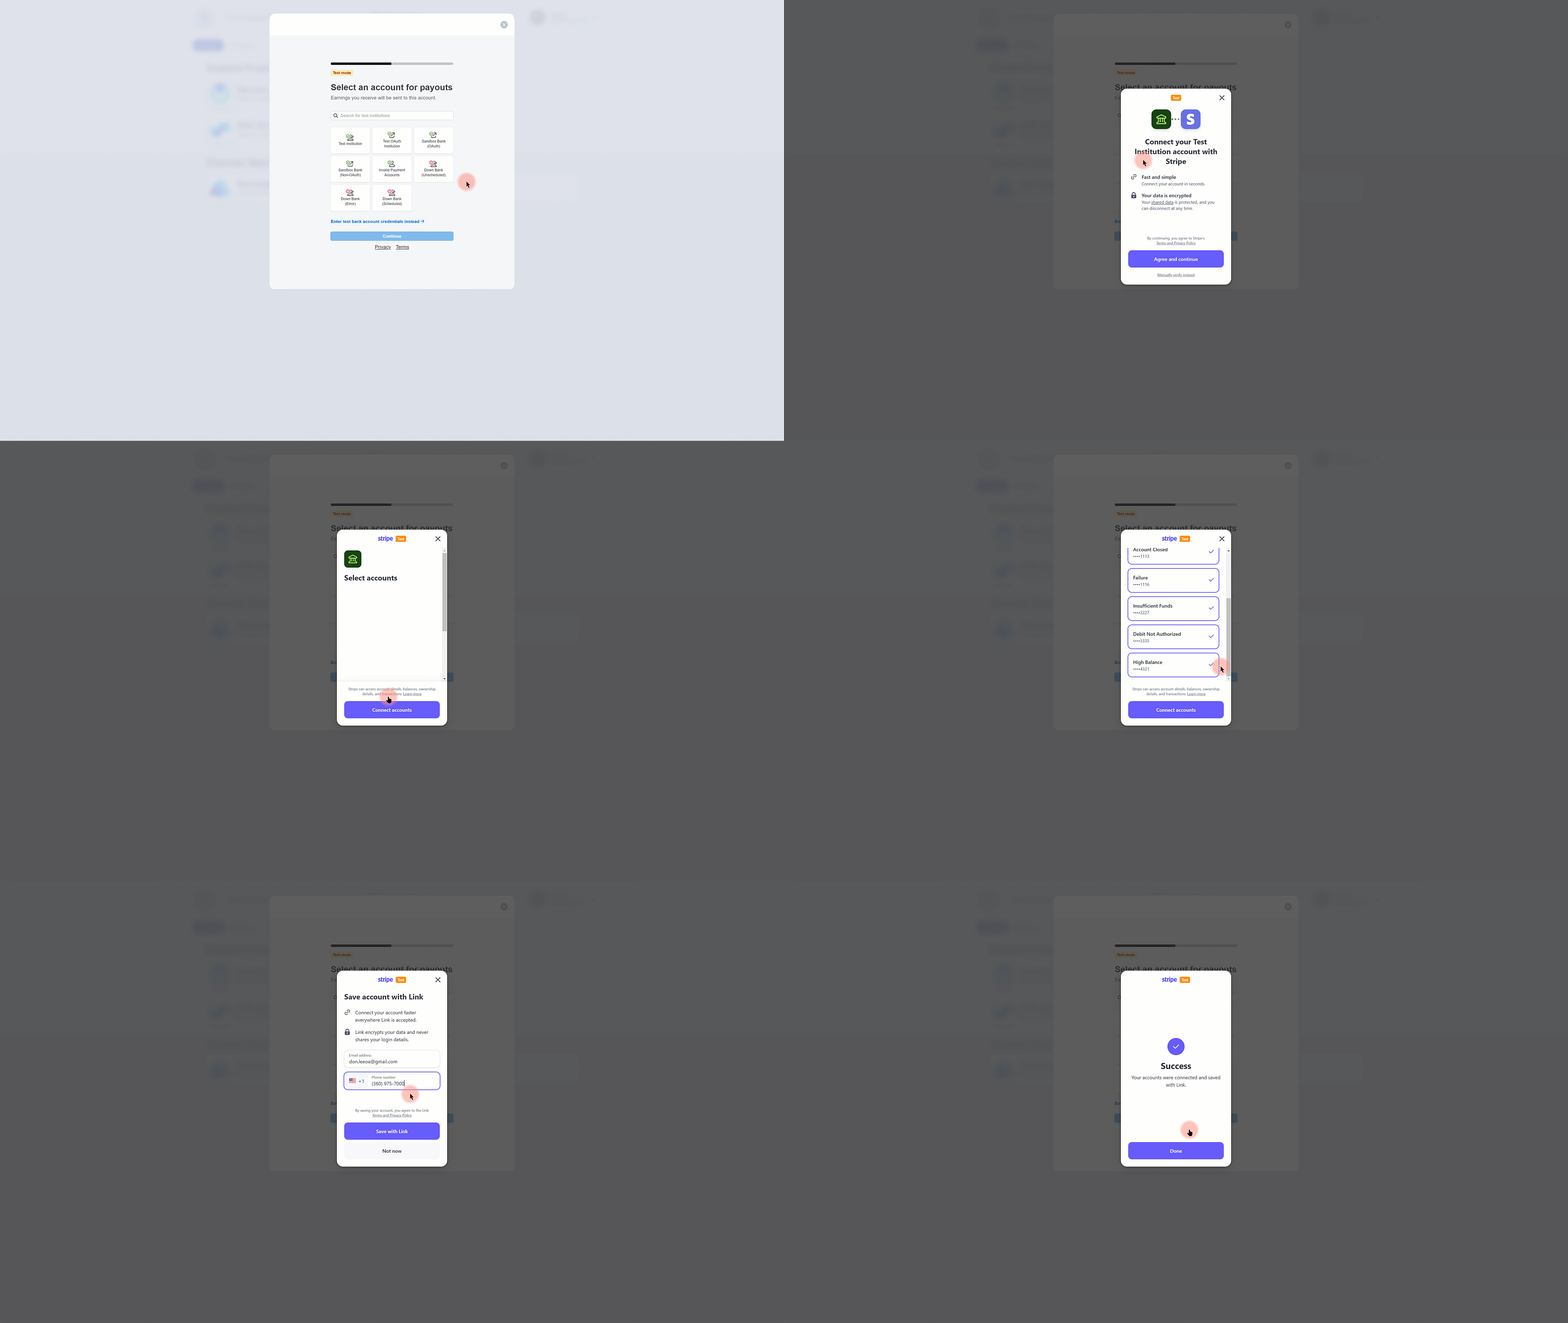
Set Up Your Receipts
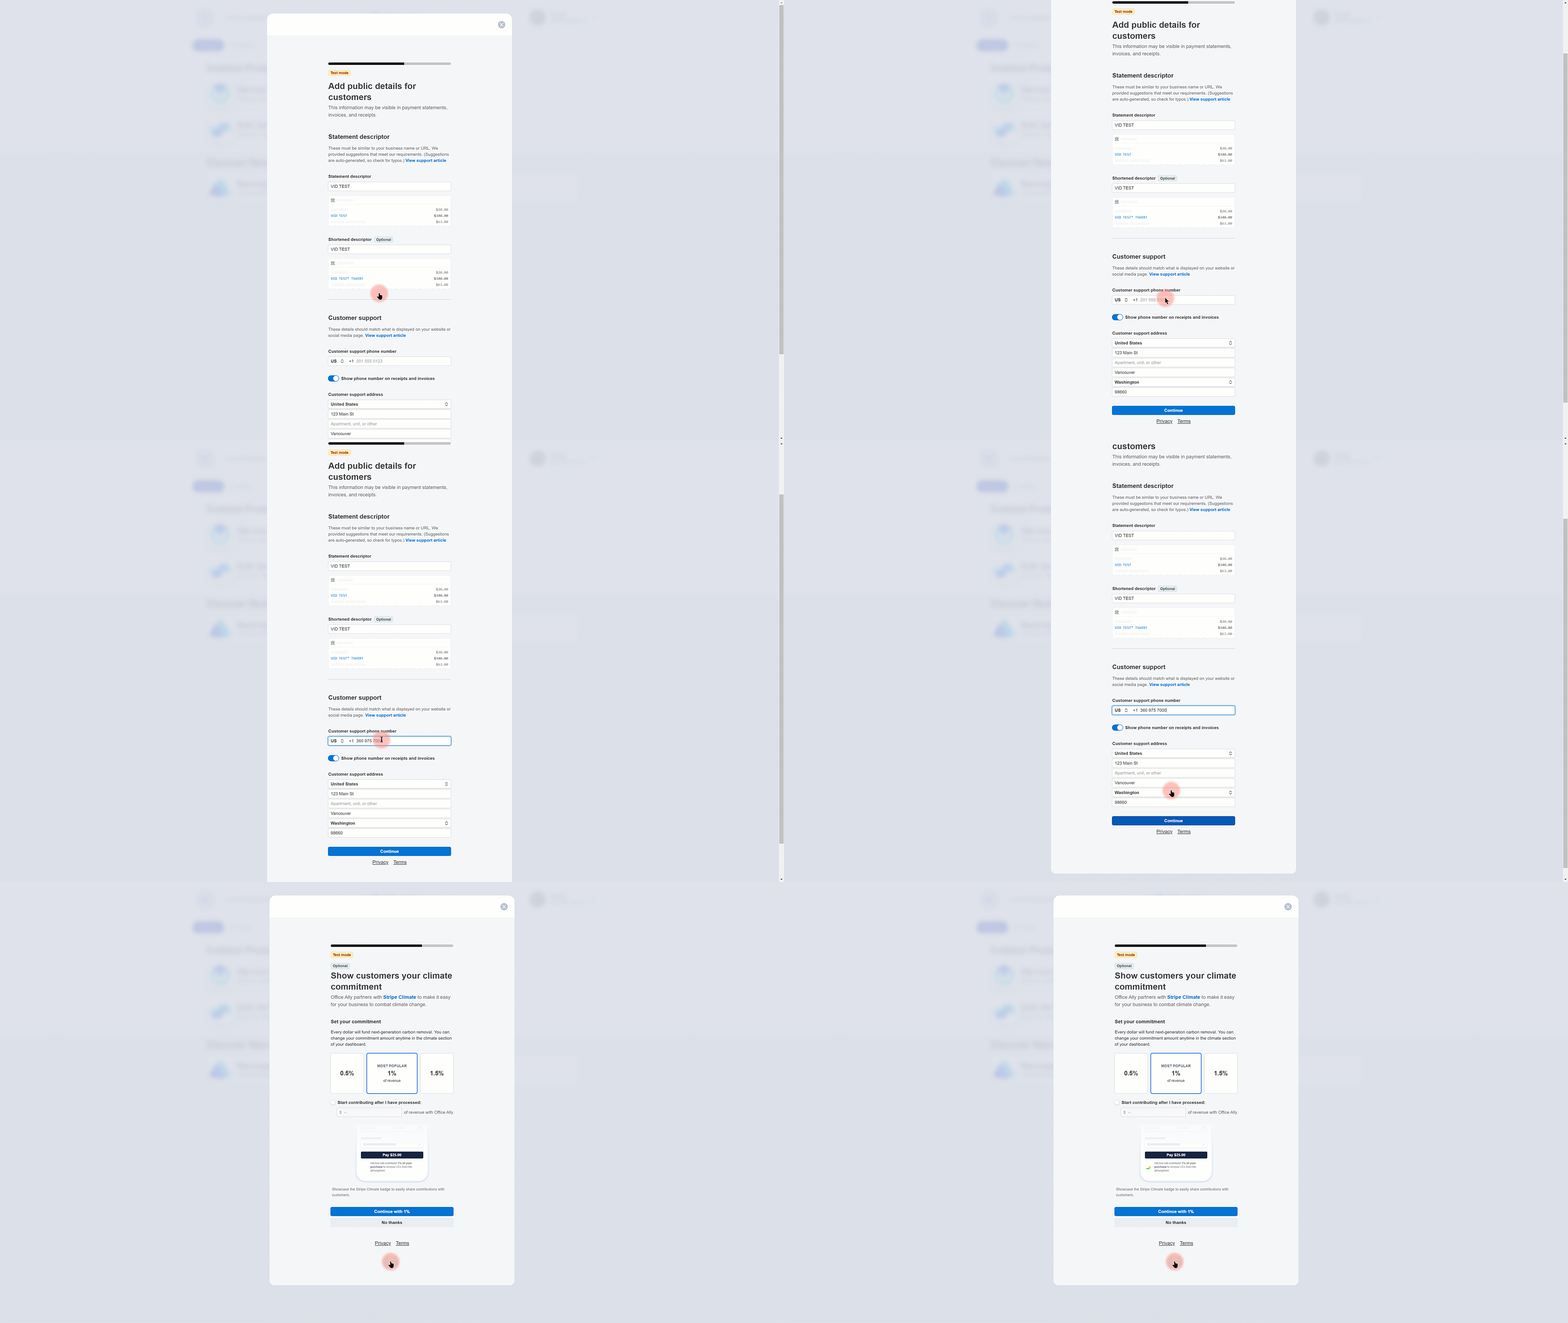
STEP 6
On the Add Public Details for Customers tab of the Stripe enrollment, provide the information you want printed on any physically printed receipts, such as your practice's phone number, address and payment details.
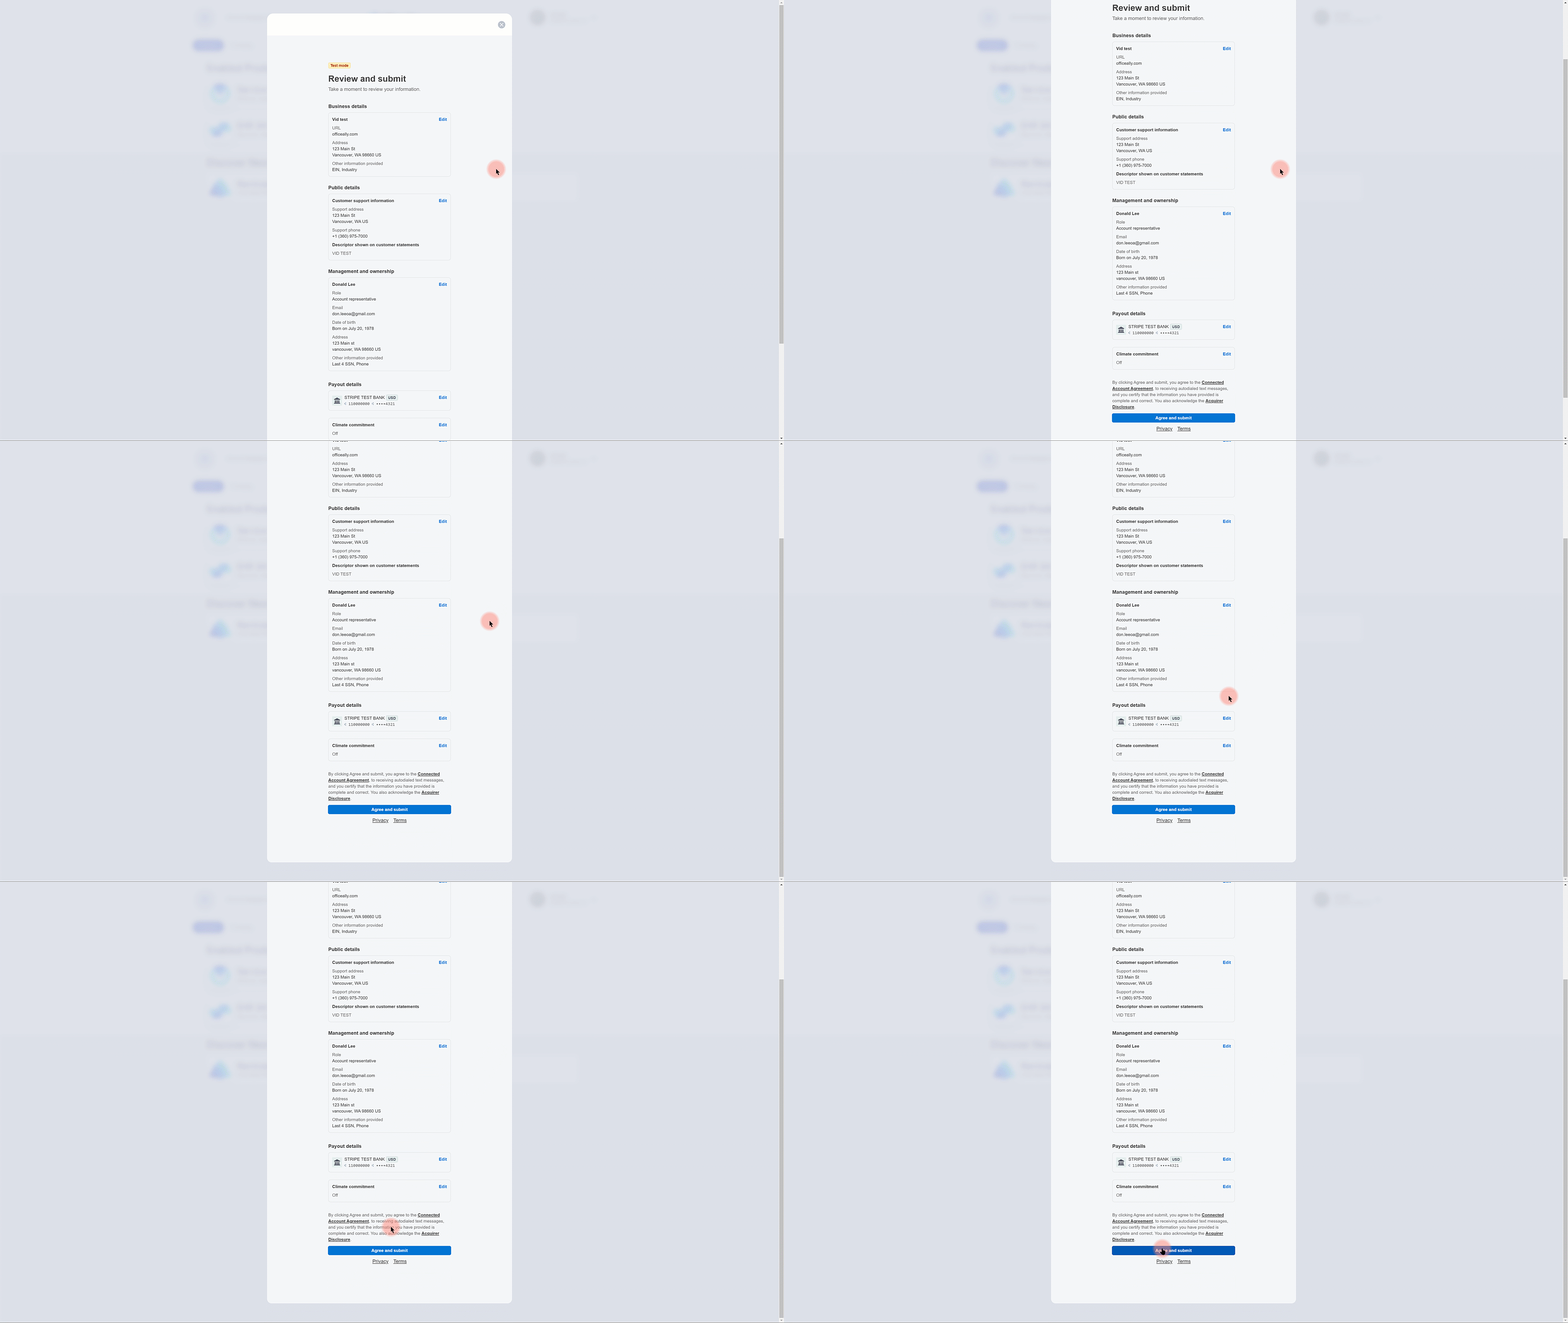
Review and Submit
STEP 7
Once you have completed the Stripe enrollment form, review your data, agree to Stripe Terms of Service and submit your enrollment information.
Processing Payments Through Patient Payments Inside Practice Mate
Opening Patient Payments
STEP 1
To open Patient Payment from the Accounting Tab, click on the Add New Payment/Deposit Tab.

Open Transaction Window
STEP 2
From the Add New Payment/Deposit screen, select "Credit Card" from the Payment Type field.

Enter Payment Information
STEP 3
On the Credit Card Payment screen, enter all the payment information and press "Next."
Payment information includes:
- Amount to be charged
- Cardholder's name
- Email for receipt (optional)
- Payment description (optional)

Enter Card Information
With Patient Payments, you can enter a new card or pay using a saved card on file.
STEP 4A: Enter New Card Information
On the next Credit Card Information screen, you will input the card information and submit the payment. Card information includes:
- Card Number
- Expiration Date
- CVV Security Code
- Country
- ZIP Code associated with the account holder
On this screen you can also select to "Save payment details for future purchases." Selecting this option will securely store your patient's card information for easy access during your next charged payment.

STEP 4B: Use Card-on-File
If you have a patient's card already stored, all you will need to do for future payments is enter payment information on the first Credit Card Payment screen and press next.
On the second Credit Card Payment screen, select "Saved," verify the card number is correct and then press "Process Payment."

Opening Patient Payments
STEP 1
To open Patient Payments from the Appointments Tab:
- Click on the Appointments Tab.
- Click "Check In" if you are checking the patient in or click "Check Out" if you are checking the patient out.
- Select "Credit Card" from the Payment Method drop down menu on the "Check In" or "Check Out" screen.

Enter Payment Information
STEP 2
On the Credit Card Payment screen, enter all the payment information and press "Next."
Payment Information includes:
- Amount to be charged
- Cardholder's name
- Email for receipt (optional)
- Payment description (optional)

Enter Card Information
With Patient Payments, you can enter a new card or pay using a saved card on file.
STEP 3A: Enter New Card Information
On the next Credit Card Information screen, input the card information and submit the payment. Card information includes:
- Card Number
- Expiration Date
- CVV Security Code
- Country
- ZIP Code associated with the account holder
On this screen, you can also select to "Save payment details for future purchases." Selecting this option will securely store your patient's card information for easy access during your next charged payment.

STEP 3B: Use Card-on-File
If you have a patient's card already stored, all you will need to do for future payments is enter payment information on the first Credit Card Payment screen and press next.
On the second Credit Card Payment screen you will select "Saved," verify the card number is correct and then press "Process Payment."

Opening Patient Payments
STEP 1
To open Patient Payments from the Patient Visits Tab:
- Click to Patient Visits Tab.
- Click on the Billing Info tab.
- Scroll to the "Payments" section at the bottom of the screen.
- Select "Credit Card" from the Payment Method drop-down field.

Enter Payment Information
STEP 2
On the Credit Card Payment screen, enter all the payment information and press "Next."
Payment Information includes:
- Amount to be charged
- Cardholder's name
- Email for receipt (optional)
- Payment description (optional)

Enter Card Information
With Patient Payments, you can enter a new card or pay using a saved card on file.
STEP 3A: Enter New Card Information
On the next Credit Card Information screen, input the card information and submit the payment. Card information includes:
- Card Number
- Expiration Date
- CVV Security Code
- Country
- ZIP Code associated with the account holder
On this screen you can also select to "Save payment details for future purchases." Selecting this option will securely store your patient's card information for easy access during your next charged payment.

STEP 3B: Use Card-on-File
If you have a patient's card already stored, all you will need to do for future payments is enter payment information on the first Credit Card Payment screen and press next.
On the second Credit Card Payment screen you will select "Saved," verify the card number is correct and then press "Process Payment."

Patient Payments Registration FAQ
Should I register as a company or individual?
This will depend on the account you are wanting Stripe to deposit payments into. If you want Stripe to deposit into a bank account registered to the company, register as a company. If Stripe will be depositing into a personal account, register as an individual.
Why does Stripe need this information?
Stripe depends on this information to protect your identity and assets. Much like banks do when handling account and loan procedures, Stripe utilizes this data to verify the identity of the account holder and ensure access to their bank accounts, thereby enabling proper payment deposits.
Is my personal/business data protected?
Stripe has been evaluated by a PCI-certified auditor and received a PCI Service Provider Level 1 certification. This is the most stringent level of certification in the payments industry. You can learn more about How Stripe Handles Security, here.
Is my practice able to use Stripe payment processing?
Stripe has some restrictions on what types of companies can use their services. If you have questions about whether your practice will be eligible to use Stripe payments service, please review Stripe's list of Prohibited and Restricted Business.
Return to Registration Instructions
